![[Build Report] Free-standing Backyard Climbing Wall](/assets/images/woody/Untitled%2026.png)
[Build Report] Free-standing Backyard Climbing Wall
- 27 minute readAt the time of writing this post, we’re quite a ways into the Coronavirus Quarantine in America. I lasted about two weeks without climbing before I decided to build a climbing wall in my own backyard.
Although I have some experience with woodworking, this was my first big carpentry-like project. During the process I learned and collected a fair bit of knowledge about this subject and this post is my way of consolidating that information and sharing it back with others. I’ll present some design considerations, a rough idea of the materials and cost, some photos of my build, and some tips for each step of the way.
Here are some rough stats for my build, which was an outdoor, free-standing, and fixed-angle wall:
- Size: 8’x8’ with a 30 degree overhang
- Materials: ~$465
- Climbing Holds: $413
- Crash Pad: $280
- Tools: ~$500
- Total hours to build: 40
- Hours to paint: 30
- Hours to write this post: 15
- Hours climbed in the two weeks since finishing the build: ~20
Disclaimer: I share a lot of advice in this post. Although I have schooling in an engineering discipline, please note I am not a structural engineer. I take responsibility only for the climbing wall that I’ve built. Please take responsibility for your own safety.
Design Considerations
- Size
- This entirely depends on your available space. I’d advise planning to utilize as much garage / backyard / barn space as you can get away with.
- The bare minimum should be 8’x8’ though.
- The nice thing about this kind of project is that you can start with an 8’x8’ wall and then make additions from there.
- Plywood comes in 4’x8’ sheets, so think of your wall as units of 4’x8’ and see how many of those units you can fit into your space and price range.
- Indoor vs. Outdoor
- It’s important to protect your structure from the elements, so if your wall is going outside, be prepared for the material costs to double. Pressure-treated wood, paint, stain, sealer, and a roof will all need to be accounted for.
- Free-standing vs. Existing Structure
- There are viable options for both free-standing and for attaching to an existing structure like the studs and joists on the inside of your garage, or the inside of a shed or barn.
- If you aren’t attaching to an existing structure, you’ll need to make sure your wall is designed to stand on its own without tipping over, especially after a big climbing move. This can be factored into the design, but the safest option is to bury the vertical supports in the ground and add concrete if possible. This was not an option for me, but I was able to add some auger anchors at the back that did the job.
- Angle
- In most cases I would recommend adding somewhere between 25-45 degree overhang to your wall. I chose 30 degrees, but I think the sweet spot is probably 35. If you’re a novice climber, be aware that climbing on any incline at all will feel difficult at first, but you will quickly grow in strength and acclimate to the difficulty, especially if it’s right in your backyard!
- After your wall is built, one way to mitigate the difficulty is to add volumes. Many companies sell volumes, but they should be within your skill range to build with your scrap plywood after your wall is complete.
- Adjustable
- It’s possible to design your wall so that the angle can be adjusted. I chose not to do this and can’t offer much advice in the way of this. But I can point you to this resource from Climber Dad, plans for an adjustable free-standing wall ($2.74): https://climberdad.blogspot.com/p/shop.html
- Kicker
- You’ll see these on a lot of climbing wall designs. There’s often the question whether they’re necessary, and IMO they’re only really necessary if your overhang is over 30 degrees. At that point it will be difficult to fit your feet on any holds at the bottom of the wall (or even to drill/screw the holds in).
- This vlog by Power Company Climbing goes into more detail about this design consideration:
Note: It’s easy to design a weak structure. If you do not have the relevant experience and are not referencing a sound design, please find someone qualified to take a look at your concept.
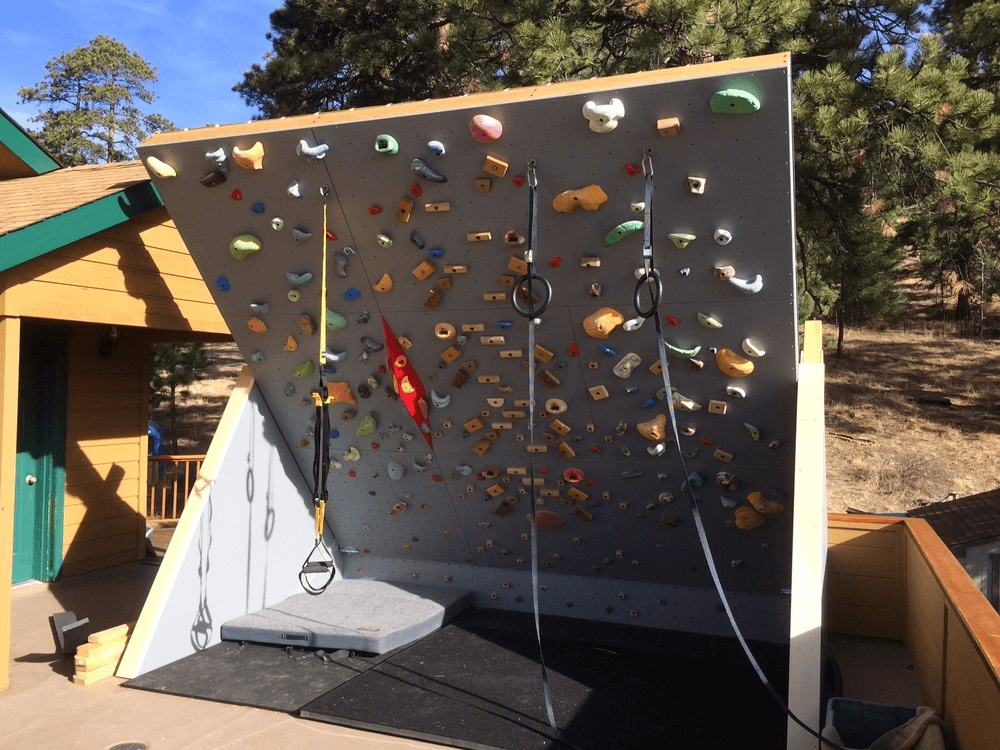
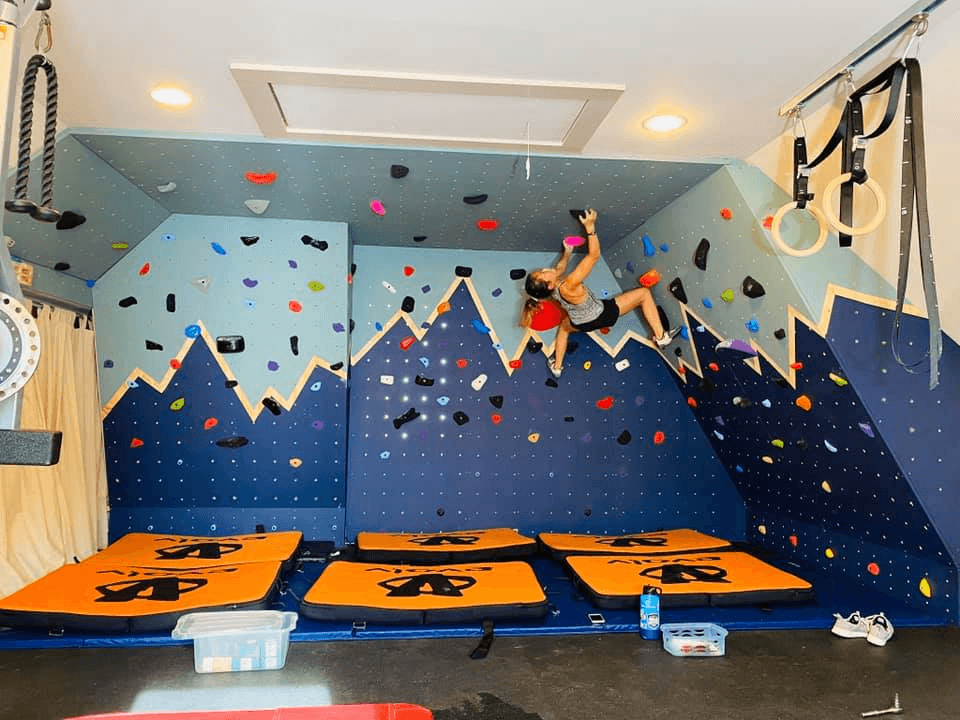
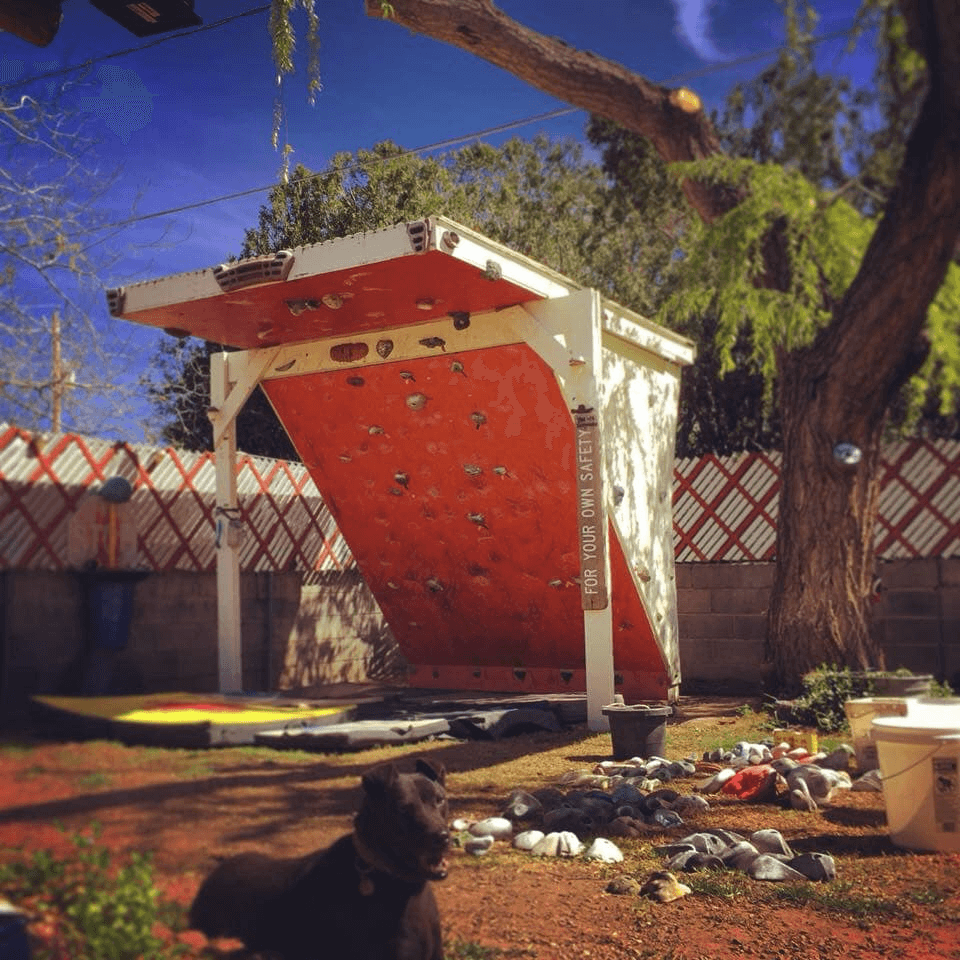
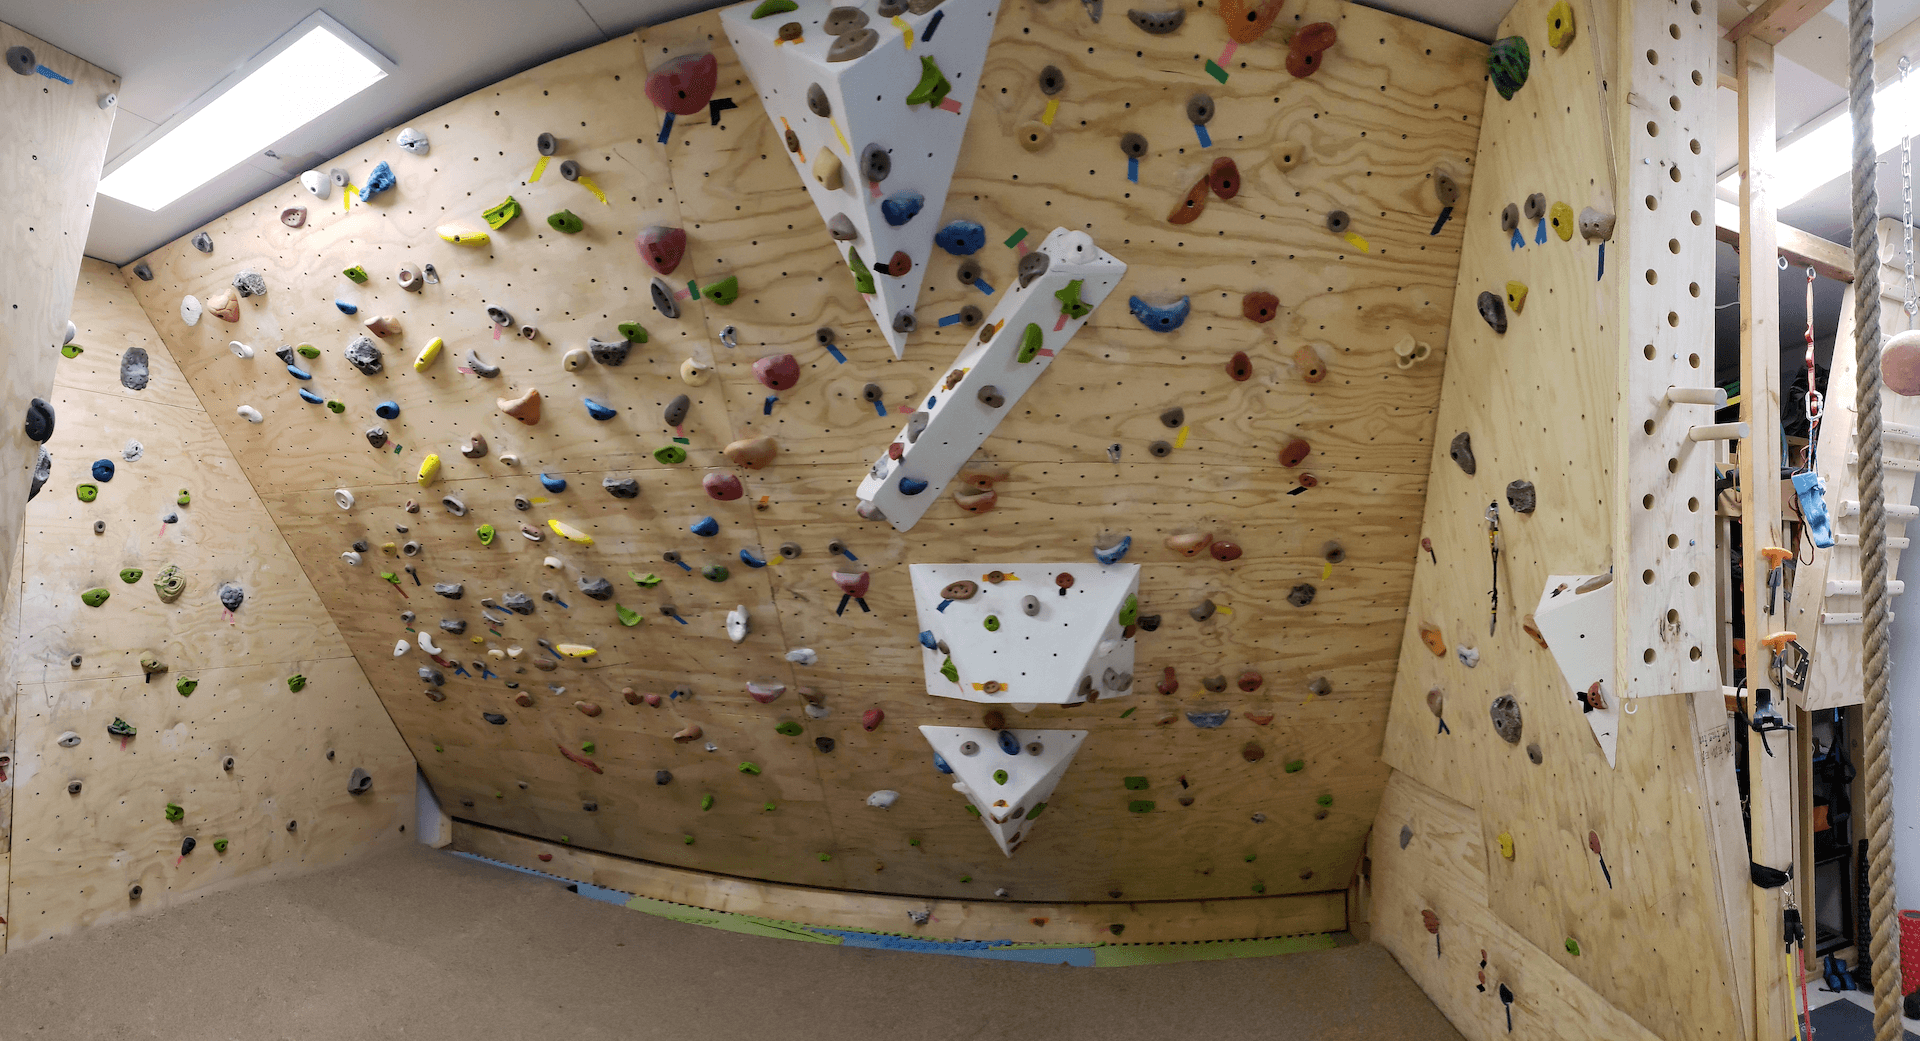
Design Inspiration
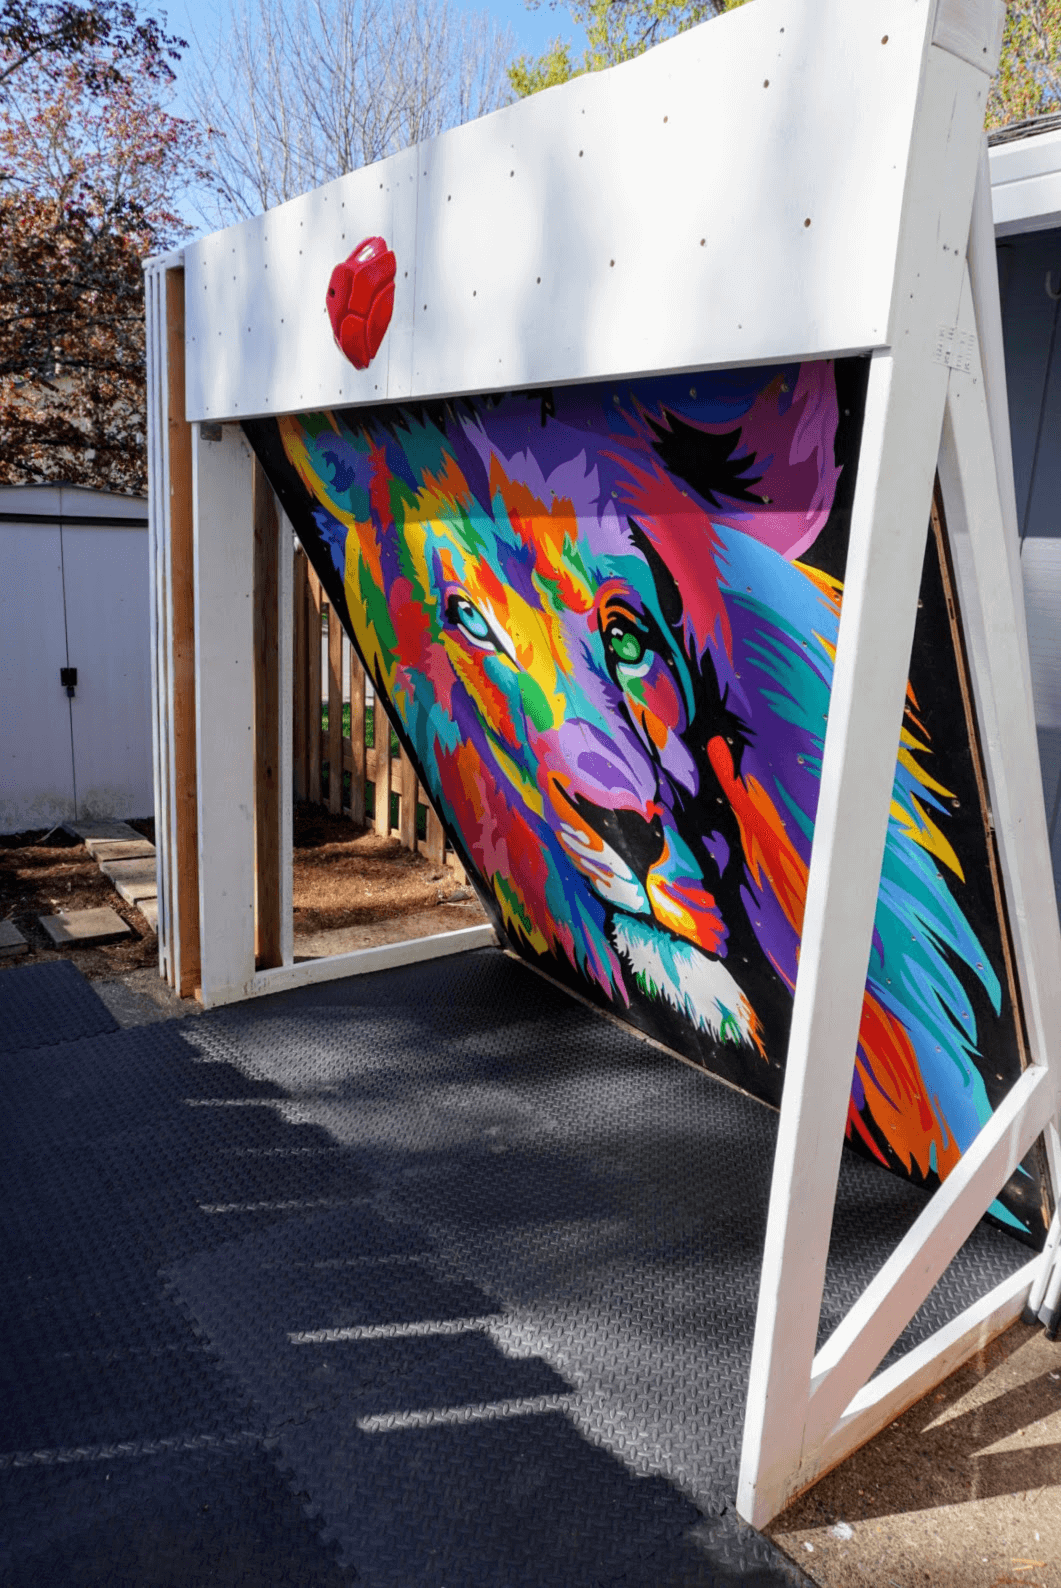
Here’s our finished wall:
Here are a few other walls that I feel are worth looking at for pointers in your own design:

Materials - Lumber and Fasteners
I’ll write a description of everything in the list and then I’ll include a final bill of materials.
- Plywood: ACX or Sanded (3/4 in x 4 ft x 8 ft) or (23/32 in x 4 ft x 8 ft)
- The ACX designation is important. The “A” in ACX means that one side is sanded nice, the “C” means that the backside is a little rougher, and the “X” means there was exterior-rated waterproof adhesives used in the manufacturing process, which translates to it being less susceptible to warping. If you can’t find the ACX designation in the description, try looking for “Sanded Plywood”, as that should be ACX grade. ACX should also be printed on the backside if you’re able to look at the physical product.
- Avoid MDF and particle board at all costs, they’re not strong enough for this application.
- 3/4” plywood is virtually the same thickness as 23/32”, but 23/32” sheets are a bit cheaper. Either thickness can used just fine, the extra 1/32” in the 3/4” won’t make a huge difference.
- You’ll want at least three sheets of 4’x8’. I wouldn’t recommend building a wall any smaller than 8’x8’ unless you’re seriously limited in space. Two of your three sheets will make 8’x8’, and the third sheet will get you any extra area you can add on, or a strip for a kicker or at the top, or for some DIY volumes.
- Lumber
- 2x6 - As a general rule, you’ll want to use 2x6 for any framing or supports.
- 2x4 - These can be used for “furring strips”, which allow you to attach your panels to another wall. These are also fine to use for 16” spaced studs, which would be any of the studs/joists in the inner of your 8’x8’ square. This will be more clear later in this guide, but the main job of this 16” spaced lumber is to provide something to screw your plywood sheets into and to protect your wall from flexing.
- Screws
- Deck screws are the best to use here, but wood or construction screws would suffice. Avoid drywall or hardened screws, they’re too brittle for this application. Grab a pound each of 1-1/4 in, 2 in, and 3 in.
- T-nuts
- The 4-prong, 3/8” are pretty standard. You can get by fine with the 4-prong, but 2-hole or 3-hole screw-ins are vastly superior for a few reasons.
- You’ll need 72-98 t-nuts per 4’x8’ sheet of plywood.
- Escape Climbing sells 2-hole screw-in t-nuts in packs of 100 for $34.
- Escape Climbing also has a hardware starter pack on Amazon that includes the following for $50:
- T-nuts - Qty 250
- 2” bolts - Qty 25
- 3” bolts - Qty 5
- 7/16” Spade Bit
- 5/16” T-handle wrench
- Framing Connectors
- The Metolius home wall climbing guide has an image that shows different types of framing connectors:
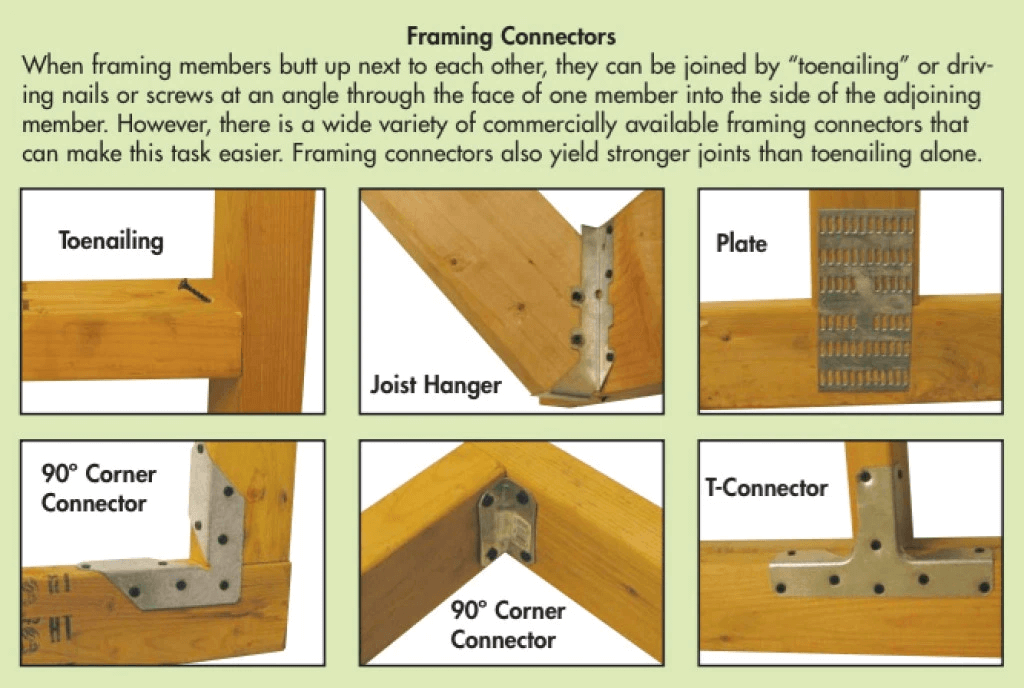
- I used plate connectors to join my framing members, and joist hangers and 90 degree corner connectors for my joists. The joist hangers should definitely be used to attach to existing structures like the supports in your garage.
- One example that is not covered above is connecting framing members in a shear configuration. In this case, you should be using 1/2” or 3/4” carriage bolts.
Padding
This is a critically important piece of your build. Do not neglect this component. There are a variety of options here and some of them may seem pricey but they are 10x cheaper than a hospital bill in America.
In general, you’ll want an inch of padding per foot of fall potential.
- Bouldering Crash Pads - $150-$340 - There’s quite a range for brands, pricing, and sizes for crash pads. $280 will get you a quality 5’x3.5’x4” pad.
- Asana Drag Pad - 6’x4’x6” - $390
- Drag Pad Cover - $215 - You might be able to find the foam for cheap from some online seller, or maybe ask a local gym owner if they have any extra foam you can buy.
- Used mattresses
- EVA Foam Tiles - 3/4” Thick, 96 Square Feet - $100 - These should NOT be used as a substitute of any of the above options. I picked this up since my wall is standing on concrete and I wanted to have some extra protection since my one crash pad can’t cover all possible fall zones.
Holds
We’ve arrived at the most expensive part of the build. Climbing holds tend to run $5-$10 each, and you’ll want about 32 holds (or a 10 lb box of holds) per plywood sheet. Expect $150~$250 per 32 holds. I would think of it like a gym membership, which tend to run ~$75 per month.
Note: At the time of this writing, in May of 2020 during the midst of the Coronavirus Pandemic, climbing holds are incredibly hard to come by. Nearly all major manufacturers are sold out and on major backorder.
All that said, I’ll list some recommendations for some options below:
-
Atomik Climbing Holds - This company has an incredible staff that have been putting in some serious work to tackle down a huge influx of new orders during the Coronavirus pandemic. They are promising a 5 day turnaround, and need to shut down new orders whenever their capacity has been reached.
If you do manage to place an order, they have a large selection of different bundles for all experience levels. I went with the Great 108 ($363) and was very happy with the 68 bolt-ons and 40 screw-ons. The screw-ons end up being great footholds or even handholds if you’re feeling strong.
- Escape Climbing - I’m a fan of Escape’s selection of hardware and holds. They have two offerings that I’d recommend looking into:
- Monthly Climbing Hold Subscription - $35, $50, $75, and $100 levels. The contents of these boxes also end up being discounted 15-20% from standard pricing. I’ve received one $50 box so far, which came with one macro that can be set in a variety of ways. The monthly box is a fun way to keep up variety on your wall.
- Factory Seconds - $110 per 10 lb box
-
Thrive Climbing - Cosmetic Seconds - $80 per 10 lbs
-
Habit Climbing - Hold Seconds - $88 per 10 lbs
-
Element Climbing - Bulk Loose Holds - $110 per 10 lbs
- DIY - Make your own holds! There are a lot of resources that can serve as a starting point for this. Check these out for making your own wooden holds:
- DIY Climbing Holds Facebook Group - A great community with 4k members at the time of this writing, they have a lot of knowledge and ready advice.
- Climber Dad on YouTube has a couple vids:
- Out of a 2x4: https://youtu.be/c8EE0_OJArU
- Out of Plywood: https://youtu.be/PNHXthzm_jA
- Dave MacLeod has this video on how to make wooden holds: https://youtu.be/s3kQZPtgzTA
Tools
Here are all the tools I used. I’ll also include a list of things that will make your life easier under “Nice-to-have”.
Note: Being new to woodwork and crafting, the different brands of power tools were difficult to parse at first, but I eventually landed on this as a simplified model:
- $$$ - Milwaukee (American), Makita (Japanese)
- $$ - DeWalt (American), Bosch (German)
- $ - Ryobi (Japanese)
The quality of the tools in these brands seemed to match up with their price points. Personally I went with the corded midrange offering for most of my tools, only splurging on a Milwaukee Cordless Impact Driver since I’d be using it the most.
Essentials
- Circular Saw - $99
- Drill - $69
- Drill Bit Set - $20
- 7/16” Spade or Forstner Bit - $4
- These are for drilling the t-nut holes. Forstner is better than spade, but both are better than a traditional drill bit. 1/2” should work just as well if you can’t find the 7/16”.
- Impact Driver - $99
- Screwdriving Set - $10
- Hex Insert Bit Set - $12 - Both a 7/32” and a 5/16” will be needed to screw in your bolts. I couldn’t find these specific sizes at Home Depot, but Escape Climbing has them here.
- Rubber Mallet - $5.5
- Speed Square - $10
- Measuring Tape - $5
- Clamps - 6” and 12” - $20 per 4-pack
- PPE - $15 - Don’t neglect this! Grab some safety glasses, ear plugs, and a face mask.
Total cost of essentials: $368.5
Nice-to-have Tools
- Workbench - I made this myself, and it ran me about $75 in materials. I followed the guide here, except I’d recommend plywood instead of a door for the top, unless you can find a nice scrap hardwood door or slab.
- Workmate - $66 - These are useful as another bench top if you don’t have a workbench, but I find the most useful feature on this is the vice.
- Sawhorses - $25~60 - These are cheap and easy to DIY too if you have some scrap wood.
- Jigsaw - $99 - I found a lot of uses for this tool. They’re good for cutting plywood, for quick rough cuts or in places that are hard to reach with the circular saw, or for cutting through metal. I also stripped a screw at one point and was only able to chop it with the jigsaw.
- T-Shank Blade Set - $16
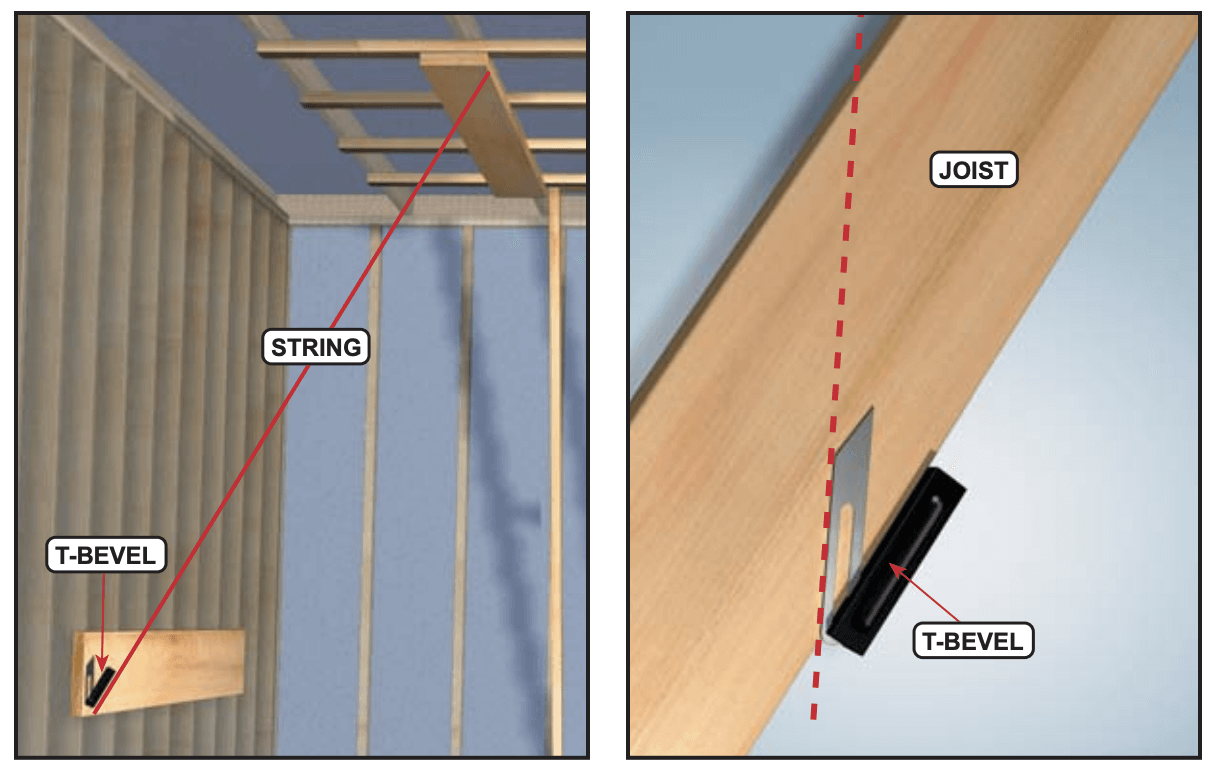
- T-bevel - $10 - These are useful for measuring cuts needed to angle your wall. The Metolius home climbing wall guide has an example for this use:
Tip: I quickly found the general precision in my cuts to be lacking, even after measuring several times. I found I was able to make up for this lack of precision by planning on leaving some material on and sanding it down to size. There are a couple types of sander power tools, but Belt Sanders seem to be the best for the job of taking down material. You can also look into a miter saw for better precision.
For Outdoor Walls
Here are the changes and additions needed for an outdoor wall. You’ll notice that putting your wall outside more than doubles the total cost of it.
- In general, all of your wood should be pressure-treated wood and you’ll need to paint and finish it, then cover it with some type of roofing or tarp.
- For the plywood, if you don’t use Marine Grade Pressure-Treated Plywood and opt for Sanded Plywood instead, you must paint or stain it and add a sealer.
- In the bill of materials lists below I only added two plywood sheets for an 8’x8’ wall, but I would recommend picking up a third to have some extra on hand.
- Your bolts must be stainless steel for outdoor walls.
- Make sure there’s a 1/2” gap along the bottom edge of your plywood so that rain water won’t touch it and be drawn into the wood.
- I haven’t used this but another thing to look into is Expanded PVC Sheet. It’s a non-porous kind of foam board that does not absorb moisture. It could be useful for any spots where outdoor wood is touching concrete.
Bill of Materials
8’x8’ Indoor Home Climbing Wall Materials (No holds or pads)
| Indoor Materials | Price | Qty | Total Price |
|---|---|---|---|
| ACX Sanded Plywood (23/32 in x 4 ft x 8 ft) | $38 | 2 | $76 |
| 2x6x8 Lumber | $6 | 8 | $48 |
| 2x4x8 Lumber | $3.38 | 4 | $13.5 |
| 2-hole commercial t-nuts (Zinc / 100 ct) | $34 | 2 (200 total) | 68 |
| Alloy Steel Bolts (75 ct) | $45 | 1 (75 total) | $45 |
| Joist Hangers | $0.90 | 8 | $7.2 |
| Plate Connectors | $0.91 | 12 | $10.92 |
| 90 degree corner connectors | 1.07 | 4 | $4.28 |
| #8 x 1-1/4 in Star Flat-Head Wood Deck Screws (1 lb Pack) | $9.50 | 1 | $9.5 |
| #8 x 2 in Star Flat-Head Wood Deck Screws (1 lb Pack) | $9.50 | 1 | $9.5 |
| #9 x 3 in Star Flat-Head Wood Deck Screws (1 lb Pack) | $9.50 | 1 | $9.5 |
| Total | 301.4 |
8’x8’ Outdoor Home Climbing Wall Materials (No holds or pads)
| Outdoor Material | Price | Qty | Total Price |
|---|---|---|---|
| AB Marine Grade Pressure-Treated Fir Plywood (3/4 in x 4 ft x 8 ft) | $76 | 2 | $152 |
| 2x6x8 Pressure-Treated Lumber | $10 | 8 | $80 |
| 2x4x8 Pressure-Treated Lumber | $6 | 4 | $24 |
| 42-hole commercial t-nuts (Zinc / 100 ct) | 34 | 2 (200 total) | 68 |
| Stainless Steel Bolts (25 pack) | $23 | 3 (75 total) | $69 |
| Tarp (8 ft x 10 ft) | $10 | 1 | $10 |
| PVC Roof Panel (26 in x 8 ft) | $15.50 | 2 | $31 |
| 1 in. Roof Fasteners (50-Pieces) | $5.50 | 1 | $5.5 |
| BEHR Ultra Flat Exterior Paint and Primer in One (1 gal) | $39 | 1 | $39 |
| BEHR Premium Stain and Sealer (1 gal) | $35 | 1 | $35 |
| Purdy Brush Pack (or paint roller set) | $20 | 1 | $20 |
| Joist Hangers | $0.90 | 8 | $7.2 |
| Plate Connectors | $0.91 | 12 | $10.92 |
| 90 degree corner connectors | $1.07 | 4 | $4.28 |
| #8 x 1-1/4 in Star Flat-Head Wood Deck Screws (1 lb Pack) | $9.50 | 1 | $9.5 |
| #8 x 2 in Star Flat-Head Wood Deck Screws (1 lb Pack) | $9.50 | 1 | $9.5 |
| #9 x 3 in Star Flat-Head Wood Deck Screws (1 lb Pack) | $9.50 | 1 | $9.5 |
| Total | 584.4 |
Guides
Check out the following guides for clarifying photos and more information on how to build your wall:
- Metolius - How to Build a Home Bouldering Wall - This guide shows how to add your wall to existing studs/joists in your garage or home.
- Atomik Climbing Holds - Build A Climbing Wall Book - This guide has some design considerations and some guidance for wood walls as well as how to attach to existing concrete walls.
- Outdoor Climbing Wall - Here’s another guide with some detailed drawings and steps for an outdoor 8’x12’ wall with concrete supports.
- Home Climbing Wall Forum (Facebook) - This is a great community of 14.7k members at the time of this writing. I’ve been a member for about a month now and have really appreciated the amount of help and guidance that the forum is able to offer. All questions, no matter how small or repeated, are answered swiftly and kindly. So if you have any questions about your design or run into any gotchas, don’t hesitate to ask here.
Steps
- Get the materials and tools
- Most large home improvement stores should have curbside pick-up available during quarantine right now. I’ve found that curbside pick-up is the best option over in-store pickup and delivery.
- I had no trouble fitting 8’ length boards in my SUV with the seats down, any longer would not have fit. I strapped my 4’x8’ plywood to my roof rack.
- Home Depot also has a truck rental service for around $20.
Warning: I would recommend trying to limit your trips to the hardware store or to go on a weekday as hardware stores are very impacted during the Coronavirus Pandemic due to the high amount of people doing home projects.
- Make necessary cuts
- Assuming you’ve made the decision on the angle of your wall and the overall size, it’s time to make your cuts. The Metolius home climbing wall guide has a bit about how to use a T-bevel to help find the angle of your cuts.
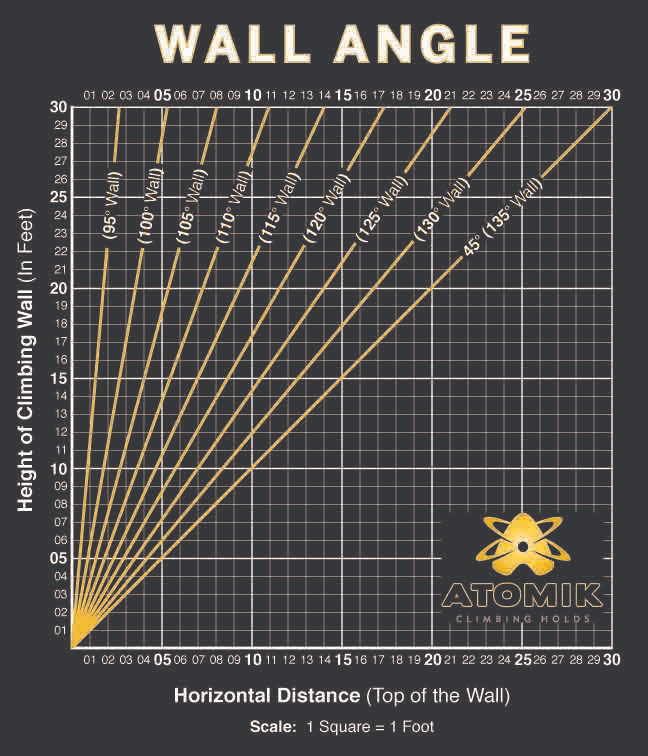
- There’s also this Wall Angle Calculator from Atomik Climbing Holds:
- And there’s also this site for calculating sides and angles: http://www.cleavebooks.co.uk/scol/calrtri.htm
- Since my wall’s angle measures 60 degrees from the ground (or a 30 degree overhang), I made the necessary 30 degree and 60 degree cuts at the ends of my 2x6 lumber so that their ends sat flush against each other and against the ground (you’ll be able to see this in the photos ahead).
- Assemble
- Add joist hangers where necessary, then add inner joists. I needed two helpers for this step.
- Once your frame is assembled, you may notice some instability, but know that the plywood will add the final reinforcement to the entire structure.
- Paint plywood
- If you’re going to paint, my recommendation is to do so before drilling the bolt holes. If you’ve already drilled the holes or if you’ve already installed the t-nuts, you can cover them up with painter’s tape or golf tees and then do your painting. But honestly, a little bit of paint won’t stop your bolt from screwing into the t-nut, so don’t worry about that part.
- Texture - It’s possible to add texture to your wall by mixing fine sand in with your paint. However, texture is definitely not necessary. I chose not to include it, and haven’t missed it.
- Curing - One thing to note is that it actually takes quite awhile for paint to fully cure! Read the label and take note of this! If you miss this step, it’s possible for the paint to cure with your holds stuck to it and it can be difficult to pry the holds away from the cured paint.
- Here’s our wall after Shan finished painting it:

I sprayed a few layers of polyurethane on this to give the wall a small level of protection against our climbing.
- Drill bolt holes
- There are a few different hole patterns you can choose from: staggered, grid, or even random. Random will be the most interesting. I went with a staggered pattern found on the Atomik Climbing Holds site: https://www.atomikclimbingholds.com/t-nut-layouts
- Remember to account for your joists/studs and adjust your hole pattern accordingly as the studs will block the holes.
Drilling tips:
- Use a 7/16” or 1/2” spade or a forstner drill bit. Forstner is better than spade, but both are better than a traditional drill bit for this use case.
- Drill from the front to the back. The drill will blow out a bit of plywood as it pops through the other side, so you’ll want to keep that blow out on the back side.
- Stack your plywood sheets together and drill their holes at the same time to save time!
- If you have a spare plywood sheet, stack it at the bottom to prevent blowout on either side of your main panels altogether.
- Add t-nuts
- This is the most tedious part of the entire project. Invite a friend over to help you with this part if possible.
- If your plywood is going into a spot where you won’t be able to easily access the back of it after installation, you should grab some Liquid Nails and a Caulk Gun and add glue to your t-nuts before putting them in their holes. They’ll pop out from their holes every once in awhile otherwise.
- If you bought 4-prong t-nuts, you’ll need to hammer them into the back of the plywood. Wear ear plugs and use a heavy mallet so that you only have to hit a couple times.
- Important: We found that our hammering did enough damage to the hole of the t-nut that we couldn’t screw the bolt into it. To get around this, we left the bolt screwed in before hammering.
- We also found that after a couple hits with the hammer, you can drill the bolt into the t-nut and it will pull the t-nut the rest of the way into the plywood.
- Screw-in t-nuts exist and they’ll be a lot easier to install than the 4-prong ones if you can find them.
- Hang plywood
- Plywood is heavy, so hopefully you can get someone to help you with this step as well.
- Use clamps or your helper to hold your plywood flush up against the studs/joists and use your 2” screws to secure the plywood to the joists. I used five screws per joist.

Top section added, fully painted, and first hold added!
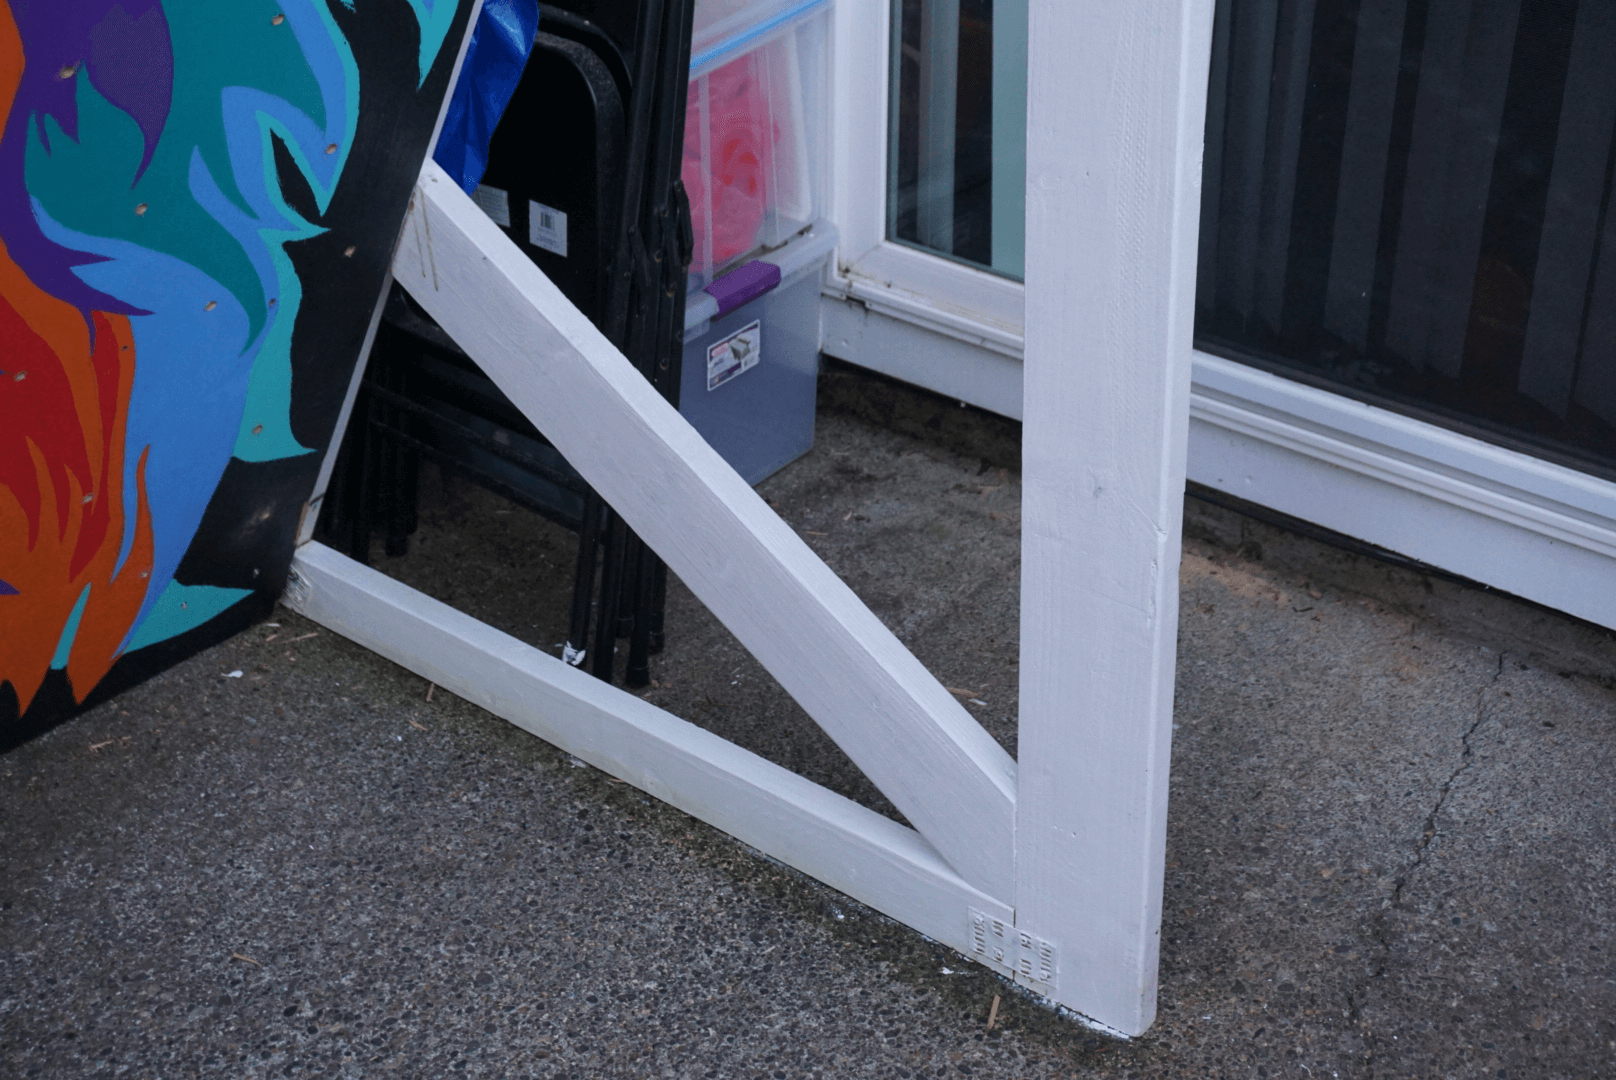
Closer look at this extra side support. By this point I was getting better at cutting, and the tolerance was so tight here that I had to hammer in that inner support! I ended up toenailing to secure it in place.

Auger anchors buried in the ground at the back to keep the whole wall from tipping.
- Add roof
- If your wall is outside, you’ll need to protect it with some type of cover. By this point you’ll have enough carpentry experience to fashion yourself a roof frame. For the actual roof, you have a couple options, but in general Google “shed roofing options”. A few options are shingles, roofing sheets (plastic or metal), or even a simple cheap tarp. I went with PVC roofing sheets.
- Here are a couple guides and photos for inspiration:
- Metal Roof: https://woodgears.ca/shed/metal_roof.html
- Reshingling a low slope roof, and a few things NOT to do: https://woodgears.ca/roof/low_slope.html
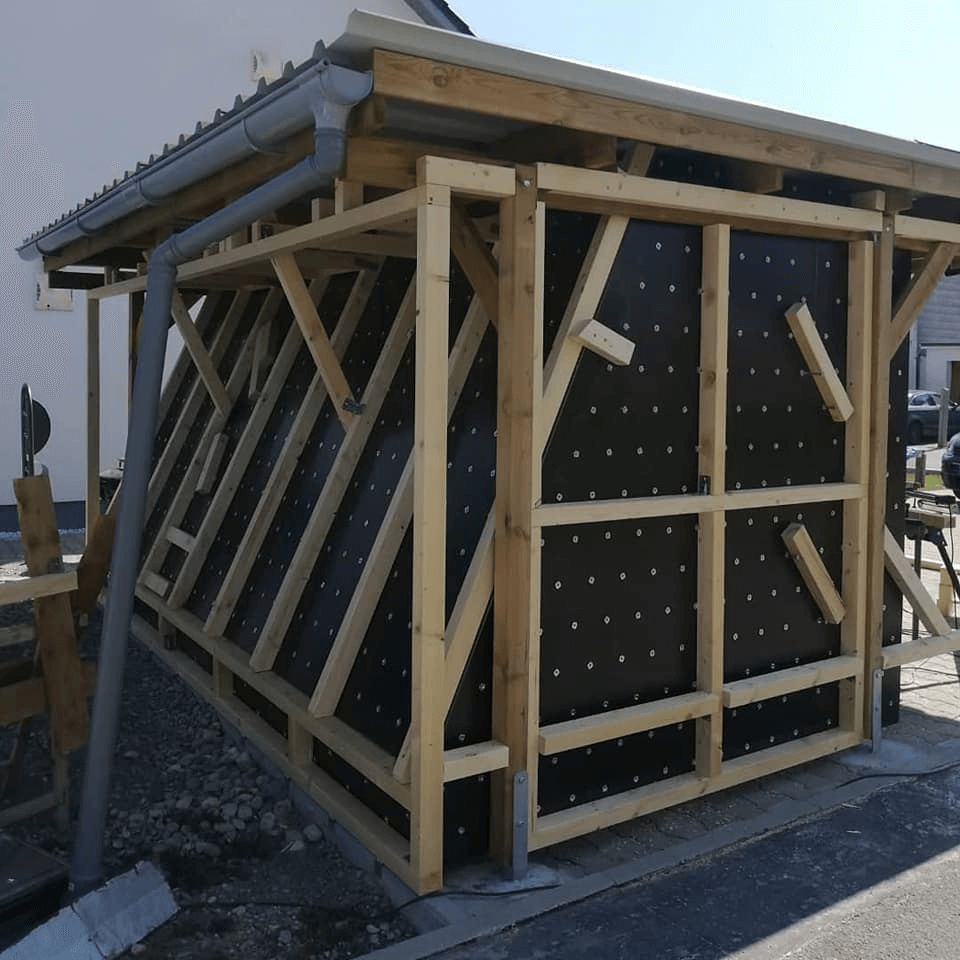
The roof system here is great, but I also got a lot of ideas from the framing job here.
- Add amenities
- Your training area should be a place of comfort. Having your wall at your own home has removed the largest barrier to training, but it doesn’t hurt to remove any other barriers by setting the area up such that you want to spend time there. Some ideas for achieving this:
- Nice lighting
- Painting the wall
- Proper heating / cooling
- Posters to get psyched about
- Music
- If you have a spare screen, get some climbing videos playing on repeat!
- Your training area should be a place of comfort. Having your wall at your own home has removed the largest barrier to training, but it doesn’t hurt to remove any other barriers by setting the area up such that you want to spend time there. Some ideas for achieving this:
- Set routes, resume the joy of climbing!
- Dave MacLeod explains some ideas for route setting in this vlog.
- Other than that, I’m still getting the hang of setting, so I can’t offer a ton of advice there. I’ll be sure to take notes and make a follow-up post if I find some decent rules or patterns!
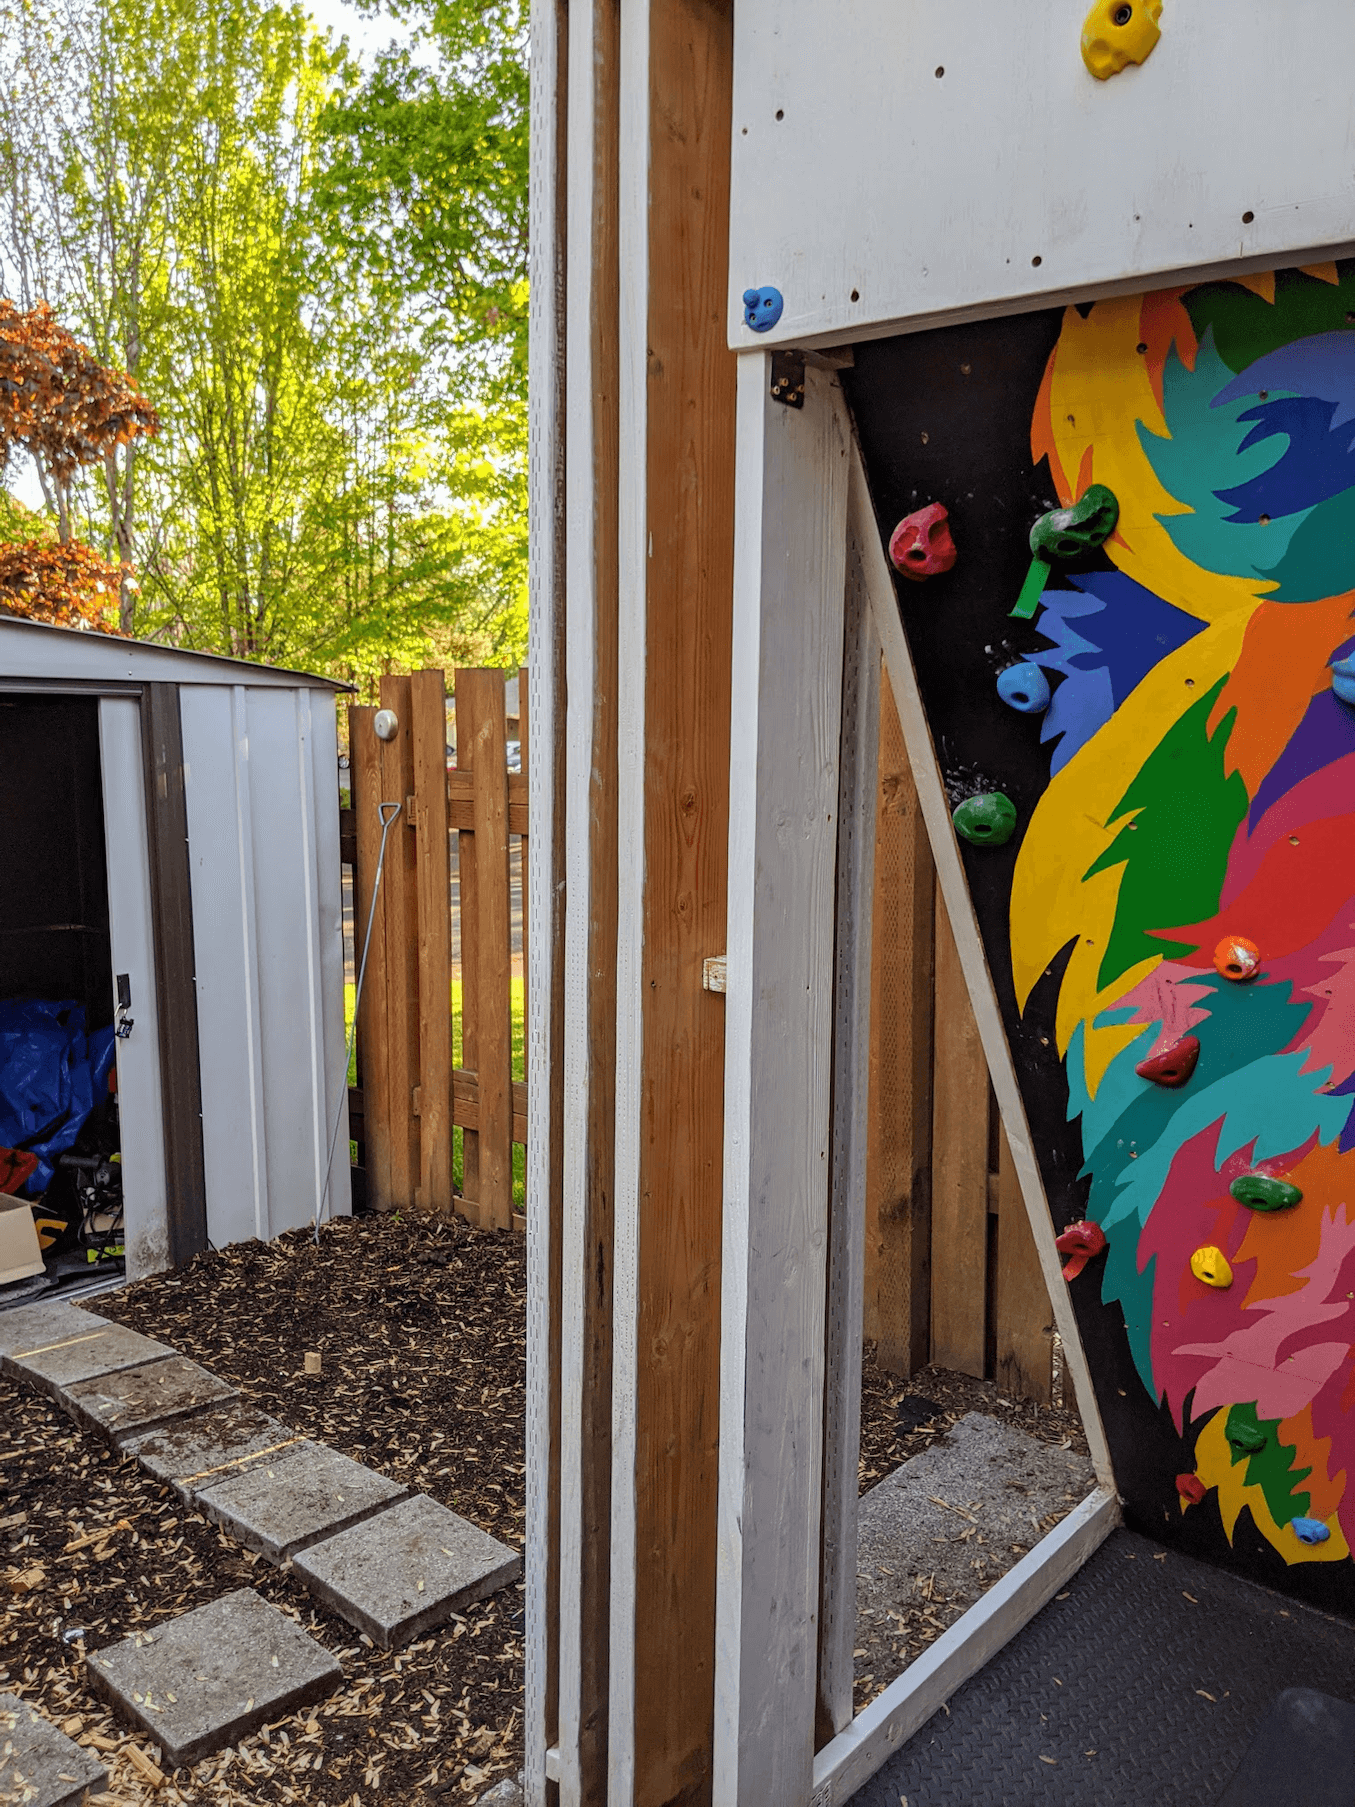
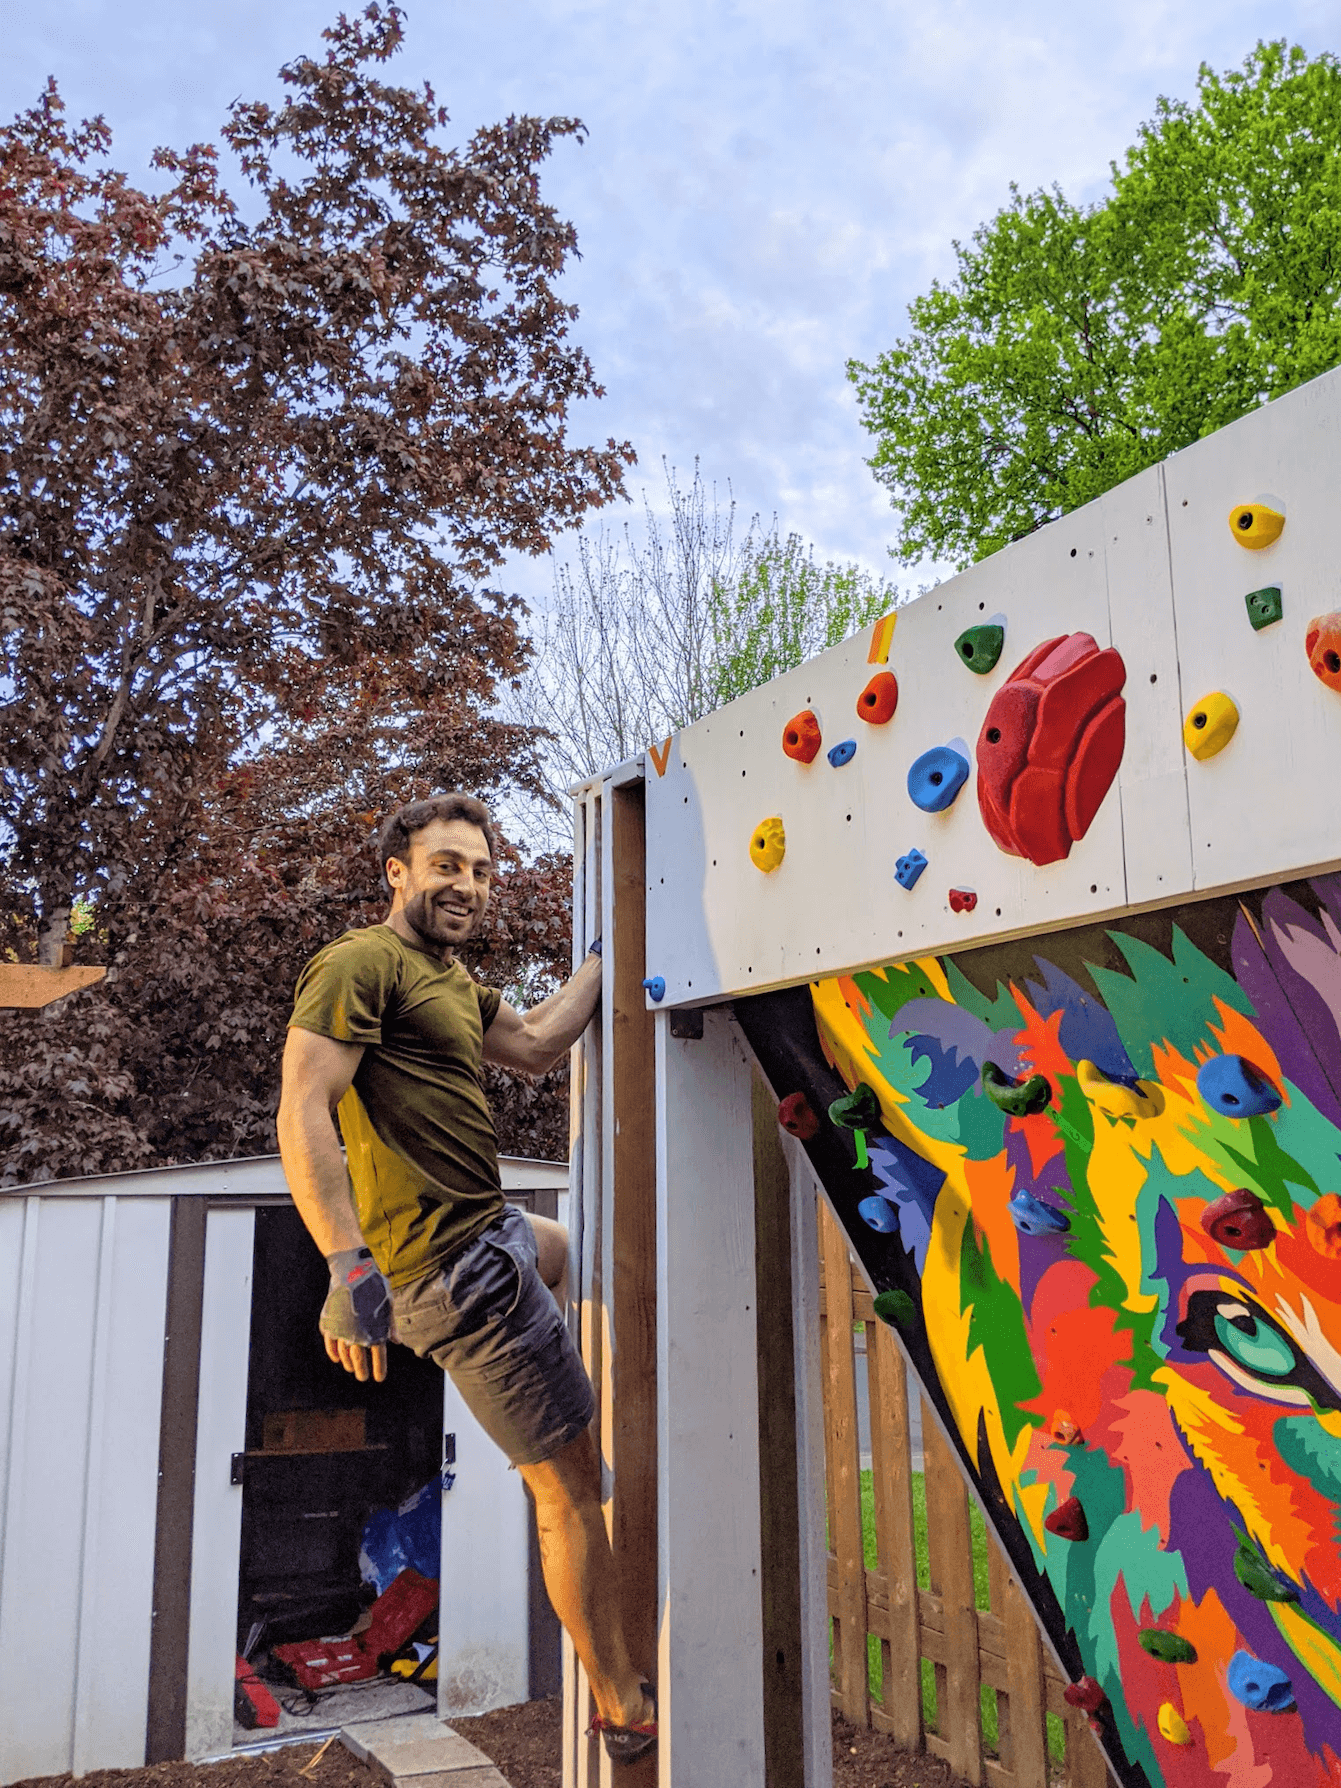
Complete. The lion painting was done by Shan using a reference photo. Holds are the Great 108 set by Atomik Climbing Holds.
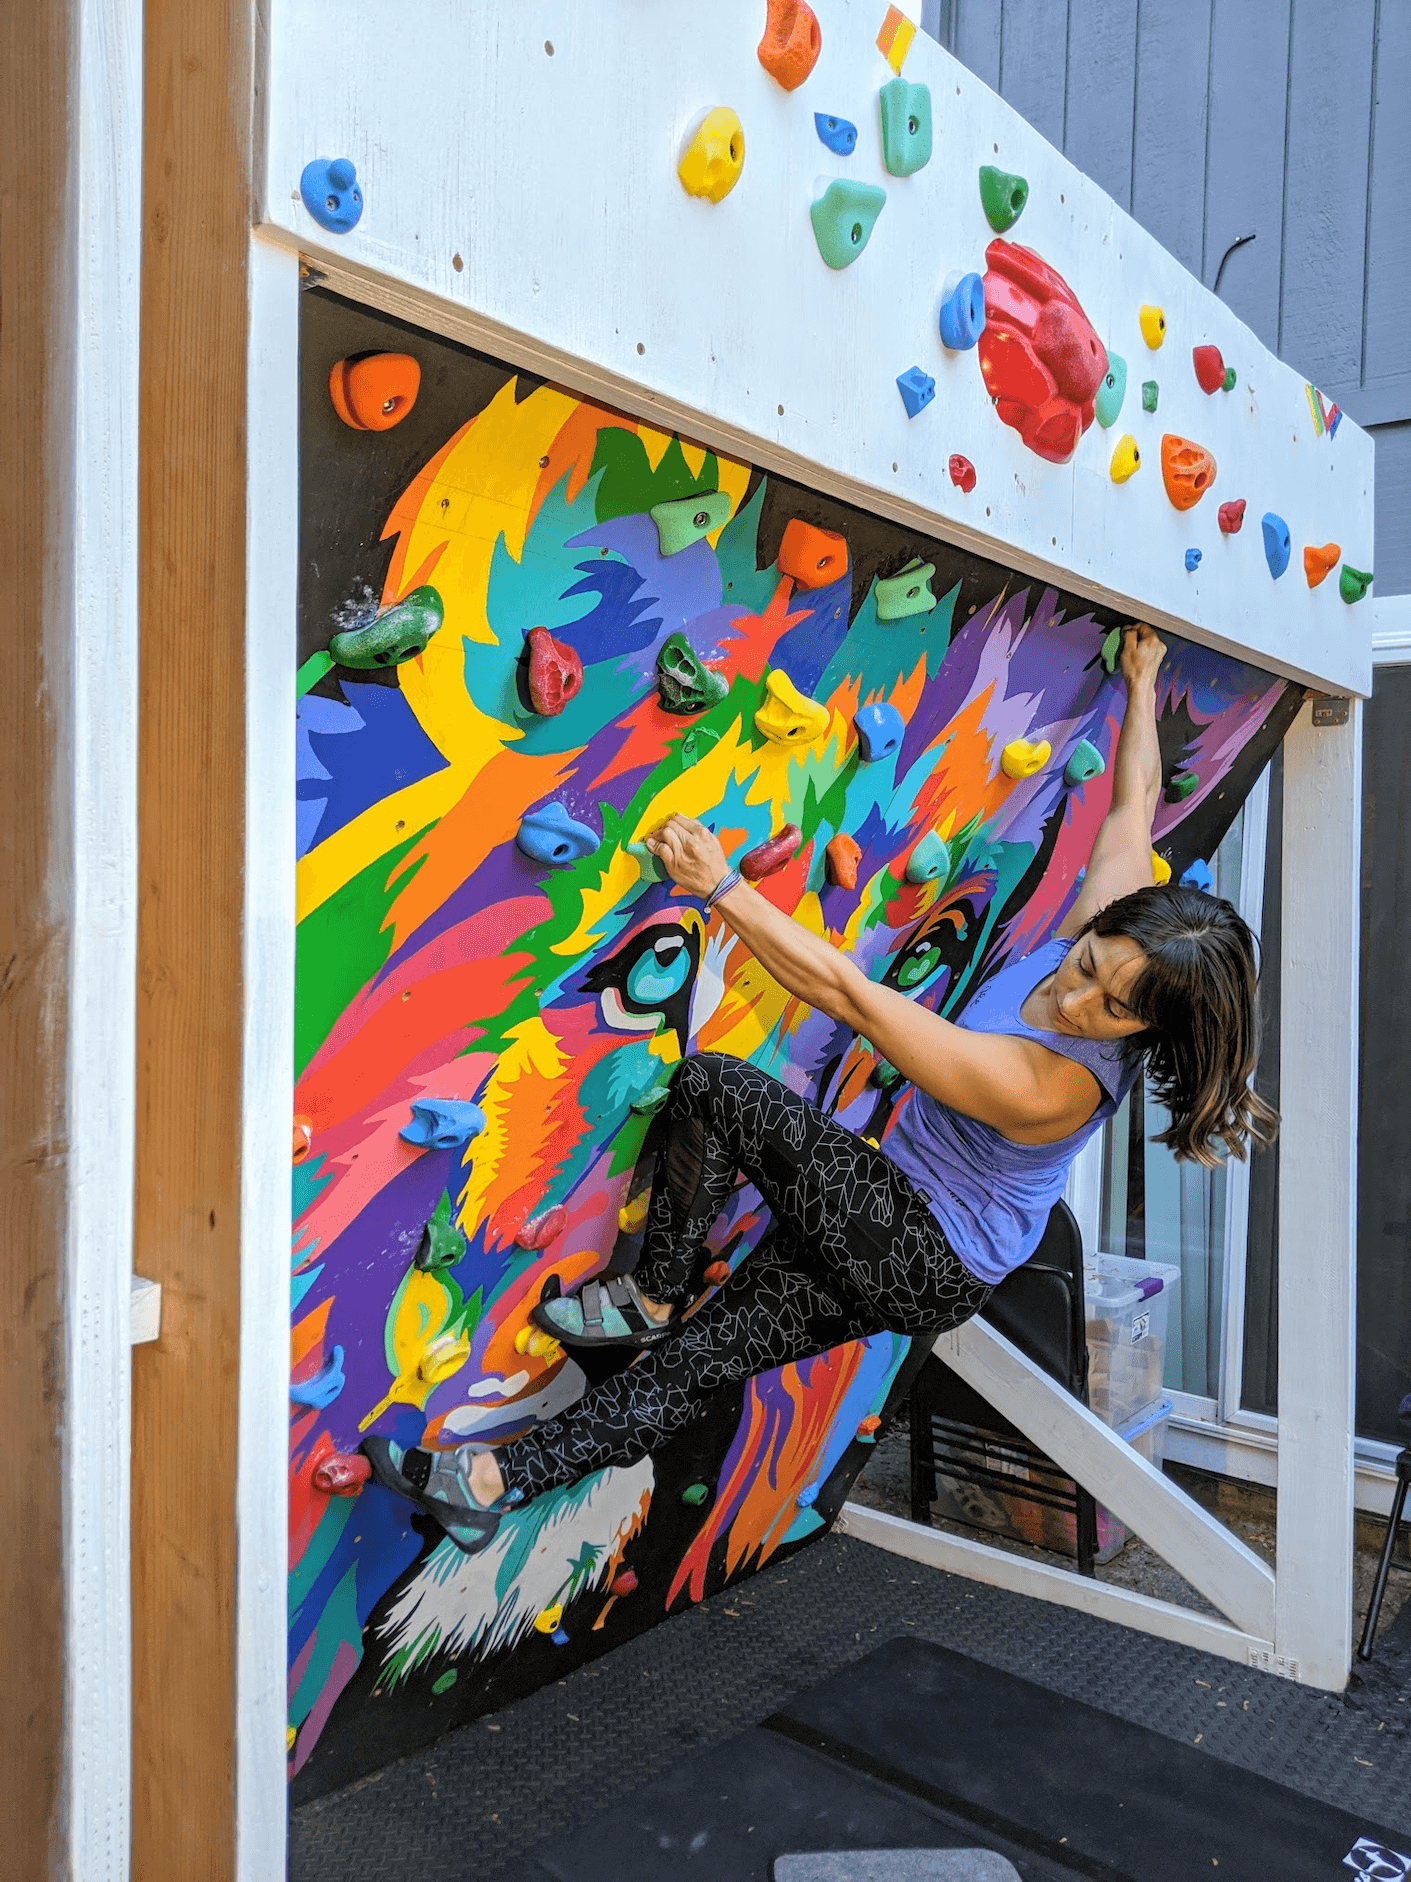
Shan testing out the new circuit she set with the seafoam holds, which are the 20 Pack Start Kit by So iLL.
Crack machine!

Crack sizes. 1”, 2”, and 4”.
Chris getting after the crack machine.
- Maintenance
The Metolius home climbing wall guide has some important pointers about maintenance, I’ll repeat them here for posterity.
- Routinely inspect all holds. If a hold becomes damaged or cracked, even if it’s a very small crack, it is no longer safe.
- Remember that holds tend to loosen after some time, especially with temperature or humidity changes. Loose, spinning holds can be very dangerous.
- Routinely inspect all hardware and wood for signs of wear. Always be vigilant about this and make any reinforcements and repairs whenever necessary.
What Would I Have Done Differently?
- I’d have planned to build a bigger wall!
- More 2x6.
- Better waterproofing from the start.
Conclusion
You’ve reached the end. I hope this guide offered some useful advice for people. Feel free to reach out to me if you have any questions or concerns: ryan@westby.io
I’d also love to see photos or stories of your builds!
Stay tuned for future posts, here are some ideas I have in mind:
- DIY Volumes
- DIY Climbing Holds
- DIY Crack Machine
Stay safe out there and happy climbing!
Best,
Ry

Ryan Westby
Coder, climber, artist, 21st century ghost